If an engine is a living heart, a carburetor is its set of lungs—metering air and fuel with delicate precision so every cylinder inhales exactly what it needs. When that precision drifts—thanks to varnish from stale fuel, microscopic grit, ethanol corrosion, cracked o-rings, or a mis-set float—the whole bike feels wrong. Cold starts become rituals. Throttle response grows lazy. Idle hunts and stalls. You twist and wait, and the bike that used to leap forward now hesitates and coughs. The fix isn’t a bottle of “mechanic-in-a-can.” It’s a meticulous cleaning and rebuild—done the right way. At Precision Powersports Service, our standard is an ultrasonic-cleaned, fully refreshed carburetor (or bank of carbs), tuned and synced so your machine breathes freely again. For riders searching “motorcycle repair near me” or reliable motorcycle repair in Broward, this is the blueprint we follow to make a carbureted bike feel factory-crisp.
Why carbs foul—and why ultrasonic cleaning is different
Gasoline ages. Additives separate. Ethanol attracts water and corrodes soft metals. Jets the width of a human hair collect varnish you can’t see but your engine can feel. Traditional spray-and-pray cleanings miss internal emulsification passages, idle galleries, and air bleeds that snake deep into the cast body. An ultrasonic cleaner uses high-frequency cavitation (tiny collapsing bubbles) to scrub every wetted surface—even the blind holes you can’t reach with bristles or wire—without gouging jets or enlarging calibrated orifices. The result is surgical-level cleanliness across the entire fuel metering system, not just the parts your eyes can spot.
Common symptoms that point to a dirty or compromised carb:
- Hard starting, especially cold; needs excessive choke/enricher
- Stalling or hanging idle; “hunting” RPM at stoplights
- Flat spots, bogging, or hesitation on roll-on
- Surging at steady throttle; “four-stroking” on two-strokes
- Backfires/pops on decel; fuel smell, wet plugs, poor mileage
- Fuel leaks from bowl gaskets, overflow, or accelerator pump
Left alone, minor fouling snowballs into stuck floats, flooded cylinders, washed rings, and diluted crankcase oil. Good news: a disciplined ultrasonic rebuild resets everything.
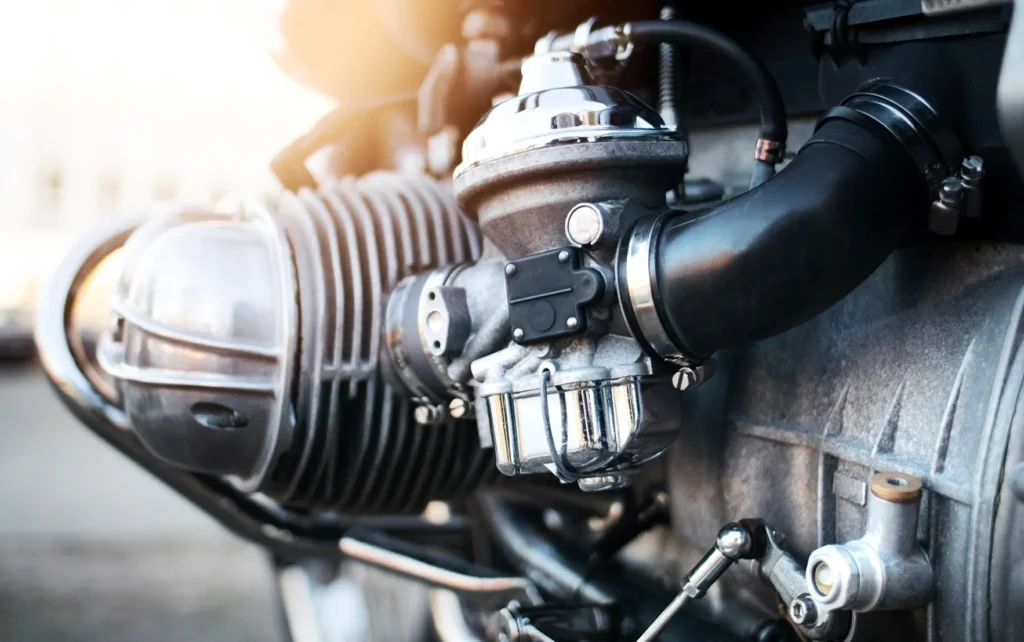
Anatomy of a carb (what we refresh and why it matters)
A carb’s job is simple on paper—blend air and atomized fuel—but the hardware is a ballet of tiny parts:
- Float, needle, and seat: establish bowl fuel level. If the level is wrong, everything is wrong.
- Pilot (slow) circuit: governs idle and just off-idle. Any varnish here = hard starts, stalling.
- Needle & needle jet (emulsion tube): shapes midrange fueling; ovalized tubes cause persistent richness.
- Main jet: full-throttle fueling; size and cleanliness drive top-end power.
- Air bleeds & emulsion passages: mix air into fuel for atomization; invisible clogs = soggy throttle.
- Choke/enricher or cold-start plunger: gets you lit on cold mornings; worn o-rings leak and flood.
- Accelerator pump (where fitted): adds a squirt for sharp throttle; cracked diaphragm = big bog.
- Slides & CV diaphragms: regulate air velocity; pinholes or tears create dead zones in response.
- Shaft seals, bowl gaskets, and o-rings: keep air and fuel where they belong; ethanol hardens them.
Every one of these gets attention in a proper rebuild.
Our Precision Powersports Service ultrasonic rebuild—start to finish, no shortcuts
We treat carburetors like precision instruments. Here’s what “done right the first time” looks like in our shop:
1) Intake system triage (before the wrench turns)
We verify the whole path from tank to intake boots. Rusty tanks shed flakes that re-clog fresh carbs; split boots create vacuum leaks that masquerade as jetting issues. Petcocks (especially vacuum types) get tested, and we plan for inline filtration if the bike didn’t have it.
2) Complete, photographed disassembly
Each carb (or rack) is torn down on clean benches. Jets, emulsion tubes, mixture screws (with spring/washer/o-ring stacks), floats/needles/seats, choke plungers, and accelerator pumps are cataloged in segmented trays. We note jet sizes, clip positions, and factory baselines so we can compare “what was” to “what should be.” For Japanese bikes we use JIS drivers to avoid cam-out and replace mangled bowl screws with stainless Allen caps.
3) Pre-clean inspection and measurement
- Check slides for wear, diaphragm integrity under bright light, and smooth bore movement.
- Measure float height and inspect needles for grooves.
- Inspect needle jets for ovalization (a frequent, sneaky richness culprit).
- Verify throttle shaft bushings and seals; on multi-carb racks we assess whether the rack needs splitting for shaft seals.
4) Ultrasonic bath (the magic step)
- Bath chemistry: an aqueous, aluminum-safe solution that cuts varnish and fuel gum without etching.
- Temperature: typically 50–60°C (122–140°F) for best cavitation and degreasing.
- Frequency & duration: commercial units in the 28–40 kHz range; we run cycles until passages rinse clean (often multiple shorter cycles, rotating parts for coverage).
- Parts selection: brass jets, emulsion tubes, bodies, and metal hardware go in; diaphragms, rubber, and some plastics stay out (those we hand-clean to protect elastomers).
After the bath we hot-rinse, blow-dry with controlled compressed air (careful around check-valves), and verify every gallery with spray and air until we see an unimpeded stream where it should be.
5) Rebuild with ethanol-safe soft parts
We install new bowl gaskets, Viton o-rings, float needles/seats, choke plunger seals, and accelerator pump diaphragms as required. Mixture screws are reassembled in the correct order (spring → washer → o-ring)—missing that tiny washer is a classic DIY mistake that tears the o-ring and creates sneaky air leaks.
6) Baseline calibration & float setting
- Set float height to spec using a machinist’s rule or the clear-tube fuel level method.
- Return needle clip and main/pilot jets to factory (or known-good) sizes; document any changes if altitude/exhaust/airbox mods require it.
- Gently seat mixture screws, then back out to baseline (often 1.5–2.5 turns). Never force them; the seat is soft and easily damaged.
7) Rack reassembly & bench sync
For multi-carb bikes, we set the throttle plates (or slides) to a uniform baseline “crack” using a feeler, drill bit, or light method. Linkages are cleaned and lubed sparingly so they return smartly without attracting dust.
8) Leak test & live sync
We feed from an auxiliary tank, verify no leaks at bowls/tees, then warm the engine for a vacuum sync using a 4-column manometer (or equivalent). Fine idle quality and crisp pickup come from a tight sync paired with correct mixture. Throttle cable free play is dialed, and hot restarts are tested.
9) Real-world tuning
We road test for transient response, part-throttle smoothness, and WOT power. If the bike has pipe/airbox changes or lives at unusual altitude, we jet accordingly—small, methodical steps only. We read plugs, log behavior, and deliver a setup that’s clean, predictable, and repeatable.
Tuning, jetting, and the art behind the numbers
Jetting is science backed by feel. Even two identical bikes can prefer slightly different trims depending on condition, weather, and mods.
- Pilot circuit (idle to ~1/8 throttle): Affects starting, off-idle stumble, and stoplight manners. If you need loads of choke when warm, your pilot circuit is almost certainly restricted.
- Needle/needle jet (1/4–3/4): Midrange torque and on-road rideability live here. Worn (oval) needle jets richen permanently; replace, don’t “jet around” it.
- Main jet (3/4–WOT): Top-end power. Don’t chase main jets to fix a midrange hole.
- Float level: The quiet king. Wrong fuel height makes everything else feel wrong. Always verify.
CV vs. mechanical slide: CV diaphragms modulate slide height based on vacuum; any pinhole causes lethargic response. Mechanical slides obey your wrist—wonderful on dirt bikes and flat-slides, but unforgiving of bad jetting.
Altitude & weather: Thin air (higher altitude) wants leaner settings; cold, dense air wants richer. We aim for tune windows that survive seasonal swings without constant fiddling.
The supporting cast: air, fuel, and sealing
Perfect carbs can’t outrun bad neighbors. We always square away the rest:
- Airbox & filter: Foam filters must be cleaned and oiled; paper elements replaced. A torn seal guarantees a lean, dusty death.
- Intake boots & clamps: Any crack or hardening is a vacuum leak you can’t tune away. Replace.
- Exhaust & gasket leaks: A leak at the head will mimic lean pop. Fix first, then tune.
- Fuel tank & petcock: Rust gets filtered once—then sticks in your pilot jet. Clean the tank, rebuild or replace the petcock, add an inline filter you can service.
When to rebuild vs. replace
Most carbs can be saved with ultrasonic cleaning and soft parts, but we’ll recommend replacement (or major component swaps) when:
- Bodies are cracked or warped; bowl surfaces won’t seal even after dressing.
- Throttle shaft bores are sloppy and leak air (some models accept bushings/seals; others require rack work).
- Emulsion tubes and critical brass are no longer available and badly worn.
- Accident or fire damage compromised casting integrity.
Common myths (and costly mistakes) we fix weekly
- “I sprayed carb cleaner in; it’s clean.” You de-greased the outside. The blockages live deep inside.
- Ramming steel wire through jets. Congratulations—you changed the jet size. Replace, don’t ream.
- Ignoring float level. If fuel height is wrong, jetting changes are lipstick on a pig.
- Skipping the sync. Four carbs out of sync feel like low compression and bad attitude. Sync fixes the “heartbeat.”
- Leaving the tank rusty. You’ll be back with the same clogged pilot jets in two weeks.
- Over-tightening bowl screws. Warped bowls and torn gaskets don’t hold fuel; use proper torque and replace JIS screws.
Aftercare: keep it clean, keep it crisp
Carbs hate neglect. A few habits make a huge difference:
- Ride it. Regular heat cycles keep passages dry and clean.
- Stabilize fuel if you’ll park for more than a few weeks; better yet, drain bowls for long storage.
- Use ethanol-smart habits: where possible, run ethanol-free or treat fuel; ethanol swells rubber and invites water.
- Service the filter and watch for vacuum leaks annually.
- Log jetting & settings. Float height, mixture turns, jet sizes—future you will thank you.
A quick case study (why “cheap” costs more)
A customer rolled in after a “carb clean” elsewhere. The shop had sprayed the bowls, left the rusty tank untouched, and never set floats. The bike started, then drowned at lights, and smelled like raw fuel. We found stuck floats, oval needle jets, and grit in the pilots. After a proper ultrasonic rebuild, new soft parts, tank clean and filter, baseline jetting, and a vacuum sync, the bike idled like a sewing machine, snapped clean off-idle, and pulled hard to redline. He paid once more—but this time for the result he wanted. Done right beats done twice.c
Why riders choose Precision Powersports Service for carb work
We’re meticulous. Every carb set gets the same treatment we’d give our own machines:
- Commercial-grade ultrasonic cleaning with aluminum-safe chemistry
- Viton o-rings and ethanol-resistant soft parts
- Precision float height and verified fuel level
- Correct JIS tools, proper torque, and upgraded hardware where smart
- Bench sync + live vacuum sync, warm/hot tuning, and documented settings
- System-wide approach (tank → petcock → filter → carbs → boots → airbox) so the fix stays fixed
If you’ve been searching for a motorcycle shop near me that actually solves carb problems at the root—this is what that looks like.
Contact Precision Powersports Service
📍 Visit: https://precisionpowersportsservice.com
📞 Call/Text: (754) 422-6920
From single-carb thumpers to four-carb classics, two-stroke screamers to CV-equipped tourers—Precision Powersports Service brings carbs back to life with precision, not promises. If you’re in South Florida and need motorcycle carburetor cleaning, ultrasonic carb rebuilds, or dependable motorcycle repair in Broward, we’re the crew that gets it right the first time.
Clean passages. Correct settings. Crisp throttle. That’s the Precision Powersports Service way.